Considering donating if you found my post helpful 😊

OVH docs for setting up IPv6 can be a little bit confusing and inaccurate. Their cloud came with only IPv4 enabled, and you must enable IPv6 manually if you want them.
This tutorial might work with other providers too, but I only tested in OVH with Debian installed
Step 1 – Prepare some required data
You will need your Interface, IPv6, Gateway, and Netmask to start.
Go to your VPS product page and click on your server to view the details. Copy your IPv6 and Gateway.
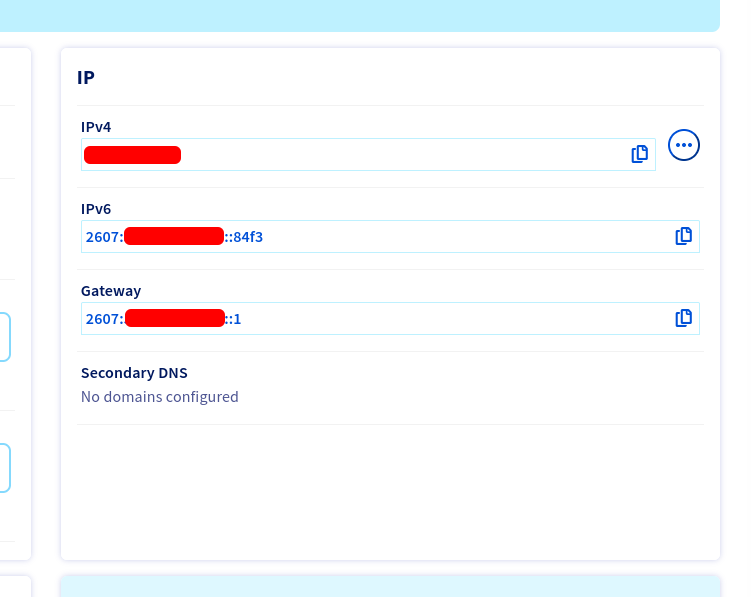
For netmask, OVH said it is usually 128, but that is wrong. Your netmask is actually 64.
For Interface, you can get it by execute $ ip a in your server SSH.
Step 2 – Edit your network interface
After step above, we have our required data:
- Interface: ens3
- IPv6 – 2607:2200:202:2301::84f3
- Gateway: 2607:2200:202:2301::1
- Netmask: 64
Edit your network interface, by creating a new configurations for IPv6
$ sudo nano /etc/network/interfaces.d/51-cloud-init-ipv6
Customize config below and paste it in the file created above
auto YOUR_INTERFACE
iface YOUR_INTERFACE inet6 static
        mtu 1500
        address YOUR_IPv6
        netmask YOUR_NETMASK
post-up /sbin/ip -6 route add YOUR_GATEWAY dev YOUR_INTERFACE
post-up /sbin/ip -6 route add default via YOUR_GATEWAY dev YOUR_INTERFACE
pre-down /sbin/ip -6 route del default via YOUR_GATEWAY dev YOUR_INTERFACE
pre-down /sbin/ip -6 route del YOUR_GATEWAY dev YOUR_INTERFACE
- YOUR_INTERFACE – Your server network interface (ens3)
- YOUR_IPv6 – Your assigned IPv6 (2607:2200:202:2301::84f3)
- YOUR_GATEWAY – Your assigned gateway (2607:2200:202:2301::1)
- YOUR_NETMASK – Your assigned netmask (64)
My complete edited configuration would be
auto ens3
iface ens3 inet6 static
        mtu 1500
        address 2607:2200:202:2301::84f3
        netmask 64
post-up /sbin/ip -6 route add 2607:2200:202:2301::1 dev ens3
post-up /sbin/ip -6 route add default via 2607:2200:202:2301::1 dev ens3
pre-down /sbin/ip -6 route del default via 2607:2200:202:2301::1 dev ens3
pre-down /sbin/ip -6 route del 2607:2200:202:2301::1 dev ens3
Save the file
Step 3 – Restart your networking
$ sudo systemctl restart networking
It might hangs for a few seconds and that is fine and normal.
If it stay hangs and your server is unreachable, you might need to reboot the server, or even use rescue mode to delete the created configurations.
Step 4 – Test your setup
You can do a few tests to validate your IPv6 connection
$ traceroute6 google.com$ curl -6 ifconfig.co
You would see related output if they are working.
Considering donating if you found my post helpful 😊